이 글은 인프런 Spring Cloud로 개발하는 마이크로서비스 애플리케이션(MSA) 강의를 듣고 쓴 글입니다.
Spring Cloud로 개발하는 마이크로서비스 애플리케이션(MSA) - 인프런 | 강의
Spring framework의 Spring Cloud 제품군을 이용하여 마이크로서비스 애플리케이션을 개발해 보는 과정입니다. Cloud Native Application으로써의 Spring Cloud를 어떻게 사용하는지, 구성을 어떻게 하는지에 대해
www.inflearn.com
API Gateway (Spring Cloud Gateway) 와 연동
이전까지 개발했던 user service를 API Gateway와 연동하자. 이전에 썼던 API Gateway를 그대로 쓴다.
apigateway-service의 application.yml 파일에 다음과 같은 설정을 추가하자.
spring:
  cloud:
    gateway:
      routes:
        - id: user-service
          uri: lb://USER-SERVICE
          predicates:
            - Path=/user-service/**
무슨 소린지 모르겠다고? 빨리 앞으로 다시 가
user-service의 /health_check API 도 다음과 같이 바꾼다.
@GetMapping("/health_check")
public String status() {
    return String.format("It's Working in User Service on PORT %s", env.getProperty("local.server.port"));
}
또한 gateway에서 forwarding 시 "/user-service" 가 자연스럽게 추가되기 때문에 다음과 클래스의 맨 앞에도 다음과 같이 수정한다. 앞에서도 같은 현상이 발생해 수정했었다. 기억 안나니?
@RestController
@RequestMapping("/user-sevice/")
public class UserController {
...생략
이제 모두 실행시키고 "http://localhost:8000/user-service/health_check" 로 요청하면 실행되고 있는 포트번호가 잘 뜰 것이다. 여기까지는 섹션 2까지의 결과이다.
User Microservice 기능 추가
이번엔 다음과 같은 기능을 추가할 것이다.
| 기능 | URI (API Gateway 사용 시) | URI (API Gateway 미사용 시) | HTTP Method |
| 전체 사용자 조회 | /user-service/users | /users | GET |
| 사용자 정보, 주문 내역 조회 | /user-service/users/{user_id} | /users/{user_id} | GET |
ResponseUser 클래스를 다음과 같이 바꿔주자.
@Data
@JsonInclude(JsonInclude.Include.NON_NULL)
public class ResponseUser {
    private String email;
    private String name;
    private String userId;
    private List<ResponseOrder> orders;
}
ResponseOrder는 생성되지 않은 클래스이다. 다음과 같이 만들자.
@Data
public class ResponseOrder {
    private String productId;
    private Integer qty;
    private Integer unitPrice;
    private Integer totalPrice;
    private Date createdAt;

    private String orderId;
}
이제 Service 클래스에 getUserByUserId(), getUserByAll() 함수를 구현해주자. 우선 인터페이스에 선언해주고, 다음과 같이 구현해주자.
@Override
public UserDto getUserByUserId(String userId) {
    UserEntity userEntity = userRepository.findByUserId(userId);

    if (userEntity == null)
        throw new UsernameNotFoundException("User not found");

    UserDto userDto = new ModelMapper().map(userEntity, UserDto.class);

    List<ResponseOrder> orders = new ArrayList<>();
    userDto.setOrders(orders);

    return userDto;
}

@Override
public Iterable<UserEntity> getUserByAll() {
    return userRepository.findAll();
}
아직 주문관련 메소드를 구현하지 않았으므로 orders는 빈 리스트로 설정한다.
UsernameNotFoundException 예외는 정확히 여기서 쓰는 예외는 아니지만 대충... 해준다.
UserRepository에는 findByUserId가 아직 선언되지 않았다. 다음과 같이 설정해준다.
public interface UserRepository extends CrudRepository<UserEntity, Long> {
    UserEntity findByUserId(String userId);
}
이제 Controller 차례다. 다음 함수들을 추가하자.
@GetMapping("/users")
public ResponseEntity<List<ResponseUser>> getUsers() {
    Iterable<UserEntity> userList = userService.getUserByAll();

    List<ResponseUser> result = new ArrayList<>();
    userList.forEach(v -> {
        result.add(new ModelMapper().map(v, ResponseUser.class));
    });

    return ResponseEntity.status(HttpStatus.OK).body(result);
}

@GetMapping("/users/{userId}")
public ResponseEntity<ResponseUser> getUser(@PathVariable("userId") String userId) {
    UserDto userDto = userService.getUserByUserId(userId);

    ResponseUser returnValue = new ModelMapper().map(userDto, ResponseUser.class);

    return ResponseEntity.status(HttpStatus.OK).body(returnValue);
}
마찬가지로 여기가 어려우면 스프링 공부하러 떠나라.
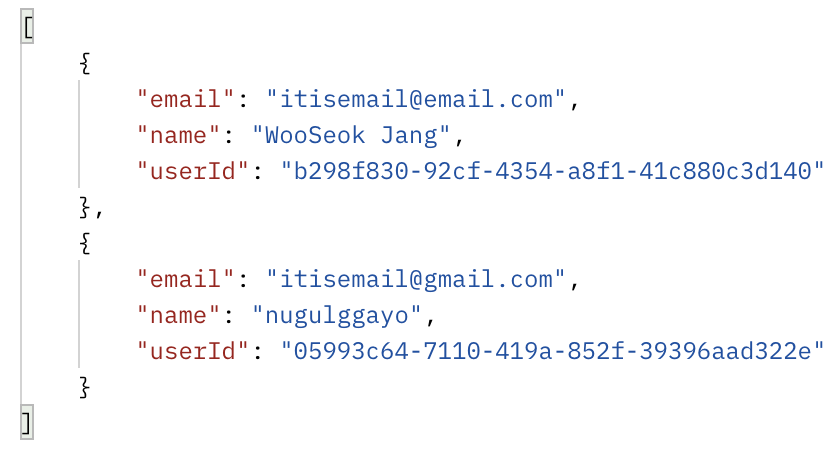
자, 이제 테스트 시간이다. 회원가입을 2명 시켜놓고 전체 사용자 조회부터 해보자.
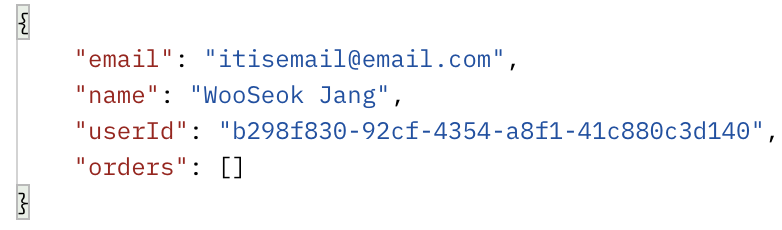
유저의 ID 값으로 사용자의 정보를 조회해보자.
Catalogs Microservice 추가
사용자가 상품을 검색하기 위한 마이크로서비스이다. 다음의 API를 개발할 것이다.
| 기능 | 마이크로서비스 | URI (API Gateway 사용 시) | HTTP Method |
| 상품 목록 조회 | Catalogs Microservice | /catalog-service/catalogs | GET |
| 사용자 별 상품 주문 | Orders Microservice | /order-service/{user_id}/orders | POST |
| 사용자 별 주문 내역 조회 | Orders Microservice | /order-service/{user_id}/orders | GET |
catalog-service 프로젝트를 만든다. 의존성은 다음과 같다. 버전은 생략한다. (앞과 같다)
의존성 : Spring Boot DevTools, Lombok, Spring Web, Spring Data JPA, H2 Database, Eureka Discovery Client, Modelmapper
application.yml 파일 설정은 user-service와 거의 같다. 다음 부분만 다르다.
spring:
  application:
    name: catalog-service
  jpa:
    hibernate:
      ddl-auto: create-drop
    show-sql: true
    generate-ddl: true
    defer-datasource-initialization: true
  sql:
    init:
      mode: always
특히, defer-datasource-initialization 부분을 넣지 않았더니 밑의 구문때문에 프로그램이 실행되지 않았다. sql.init.mode 부분을 넣지 않으면 프로그램이 실행되도 밑의 구문들이 실행되지 않는다. 만약, sql문을 시작할 때 생성하도록 할 생각이 없으면 무시해도 되는 부분들이다.
그리고 application.yml 파일과 같은 경로인 resources 경로에 몇 개의 insert 구문을 넣을 것이다. 프로그램 시작과 동시에 해당 구문들이 실행되어서 몇 개의 튜플이 생성되어 있을 것이다.
resources 경로에 data.sql 파일을 만들고 다음과 같이 작성하자.
insert into catalog(product_id, product_name, stock, unit_price)
    values ('CATALOG-001', 'Berlin', 100, 1500);
insert into catalog(product_id, product_name, stock, unit_price)
    values ('CATALOG-002', 'Tokyo', 110, 1000);
insert into catalog(product_id, product_name, stock, unit_price)
    values ('CATALOG-003', 'Stockholm', 120, 2000);
이제 Catalog의 Entity, Repository, DTO, VO 를 만들자. 설명 없이 코드만 첨부하겠다. 어렵지 않다.
@Data
@Entity
@Table(name = "catalog")
public class CatalogEntity implements Serializable {

    @Id
    @GeneratedValue(strategy = GenerationType.IDENTITY)
    private Long id;

    @Column(nullable = false, length = 120, unique = true)
    private String productId;
    @Column(nullable = false)
    private String productName;
    @Column(nullable = false)
    private Integer stock;
    @Column(nullable = false)
    private Integer unitPrice;

    @Column(nullable = false, updatable = false, insertable = false)
    @ColumnDefault(value = "CURRENT_TIMESTAMP")
    private Date createdAt;
}
public interface CatalogRepository extends CrudRepository<CatalogEntity, Long> {
CatalogEntity findByProductId(String productId);
}@Data
public class CatalogDto implements Serializable {
private String productId;
private Integer qty;
private Integer unitPrice;
private Integer totalPrice;
private String orderId;
private String userId;
}@Data
@JsonInclude(JsonInclude.Include.NON_NULL)
public class ResponseCatalog {
private String productId;
private String productName;
private Integer unitPrice;
private Integer stock;
private Date createdAt;
}이제 남은 건 Service와 Controller 이다. Service 먼저 보자.
다음과 같은 인터페이스와 구현체를 만든다.
public interface CatalogService {
    public Iterable<CatalogEntity> getAllCatalogs();
}
@Data
@Slf4j
@Service
public class CatalogServiceImpl implements CatalogService {
CatalogRepository catalogRepository;
@Autowired
public CatalogServiceImpl(CatalogRepository catalogRepository) {
this.catalogRepository = catalogRepository;
}
@Override
public Iterable<CatalogEntity> getAllCatalogs() {
return catalogRepository.findAll();
}
}@RestController
@RequestMapping("/catalog-service")
public class CatalogController {
Environment env;
CatalogService catalogService;
@Autowired
public CatalogController(Environment env, CatalogService catalogService) {
this.env = env;
this.catalogService = catalogService;
}
@GetMapping("/health_check")
public String status() {
return String.format("It's Working in User Service on PORT %s", env.getProperty("local.server.port"));
}
@GetMapping("/catalogs")
public ResponseEntity<List<ResponseCatalog>> getUsers() {
Iterable<CatalogEntity> userList = catalogService.getAllCatalogs();
List<ResponseCatalog> result = new ArrayList<>();
userList.forEach(v -> {
result.add(new ModelMapper().map(v, ResponseCatalog.class));
});
return ResponseEntity.status(HttpStatus.OK).body(result);
}
}- "/health_check" API 는 현재 서비스가 어느 포트에서 작동하고 있는지 확인할 수 있는 API 이다.
- "/catalogs" API 가 지금까지 개발한 내용이다. user-service의 "/users" API 와 비슷하다.
이제 프로그램을 실행하고 h2 console에 가보자.

API Gateway (Spring Cloud Gateway)와 연동
다음과 같은 코드를 apigateway-service의 application.yml 파일에 넣어주자.
routes:
  - id: catalog-service
    uri: lb://CATALOG-SERVICE
    predicates:
      - Path=/catalog-service/**
이러면 위에 내가 개발한 API를 8000번 포트로 사용할 수 있다.

Orders Microservice 추가
사용자가 상품을 주문하기 위한 마이크로서비스이다. 다음의 API를 개발할 것이다.
| 기능 | 마이크로서비스 | URI (API Gateway 사용 시) | HTTP Method |
| 사용자 별 상품 주문 | Orders Microservice | /order-service/{user_id}/orders | POST |
| 사용자 별 주문 내역 조회 | Orders Microservice | /order-service/{user_id}/orders | GET |
orders-service 프로젝트를 만든다. 거의 모든 내용이 이전에 했던 내용과 같으니 설명은 생략하고 코드만 언급하겠다.
의존성은 다음과 같다. 버전은 생략한다. (앞과 같다)
의존성 : Spring Boot DevTools, Lombok, Spring Web, Spring Data JPA, H2 Database, Eureka Discovery Client, Modelmapper
- application.yml
server:
  port: 0

spring:
  application:
    name: order-service
  h2:
    console:
      enabled: true
      settings:
        web-allow-others: true
      path: /h2-console
  datasource:
    driver-class-name: org.h2.Driver
    url: jdbc:h2:mem:testdb
    username: sa
    password:
  jpa:
    hibernate:
      ddl-auto: update

eureka:
  instance:
    instance-id: ${spring.application.name}:${spring.application.instance_id:${random.value}}
  client:
    register-with-eureka: true
    fetch-registry: true
    service-url:
      defaultZone: http://127.0.0.1:8761/eureka

logging:
  level:
com.example.orderservice: DEBUG- OrderEntity
@Data
@Entity
@Table(name = "orders")
public class OrderEntity {

    @Id
    @GeneratedValue(strategy = GenerationType.IDENTITY)
    private Long id;

    @Column(nullable = false, length = 120, unique = true)
    private String productId;
    @Column(nullable = false)
    private String qty;
    @Column(nullable = false)
    private Integer unitPrice;
    @Column(nullable = false)
    private Integer totalPrice;
    @Column(nullable = false)
    private String userId;
    @Column(nullable = false, unique = true)
    private String orderId;

    @Column(nullable = false, updatable = false, insertable = false)
    @ColumnDefault(value = "CURRENT_TIMESTAMP")
    private Date createdAt;
}- OrderRepository
public interface OrderRepository extends CrudRepository<OrderEntity, Long> {
    OrderEntity findByOrderId(String orderId);
    Iterable<OrderEntity> findByUserId(String userId);
}- RequestOrder
@Data
public class RequestOrder {
    private String productId;
    private Integer qty;
    private Integer unitPrice;
}- ResponseOrder
@Data
@JsonInclude(JsonInclude.Include.NON_NULL)
public class ResponseOrder {
    private String productId;
    private Integer qty;
    private Integer unitPrice;
    private Integer totalPrice;
    private Date createdAt;
}- OrderService (interface)
public interface OrderService {
    OrderDto createOrder(OrderDto orderDetails);
    OrderDto getOrderByOrderId(String orderId);
    Iterable<OrderEntity> getOrdersByUserId(String userId);
}- OrderServiceImpl
@Service
public class OrderServiceImpl implements OrderService {

    OrderRepository orderRepository;

    @Autowired
    public OrderServiceImpl(OrderRepository orderRepository) {
        this.orderRepository = orderRepository;
    }

    @Override
    public OrderDto createOrder(OrderDto orderDto) {
        orderDto.setUserId(UUID.randomUUID().toString());
        orderDto.setTotalPrice(orderDto.getQty() * orderDto.getUnitPrice());

        ModelMapper mapper = new ModelMapper();
        mapper.getConfiguration().setMatchingStrategy(MatchingStrategies.STRICT);
        OrderEntity orderEntity = mapper.map(orderDto, OrderEntity.class);

        orderRepository.save(orderEntity);

        OrderDto returnOrderDto = mapper.map(orderEntity, OrderDto.class);
        return returnOrderDto;
    }

    @Override
    public OrderDto getOrderByOrderId(String orderId) {
        OrderEntity orderEntity = orderRepository.findByOrderId(orderId);
        OrderDto orderDto = new ModelMapper().map(orderEntity, OrderDto.class);

        return orderDto;
    }

    @Override
    public Iterable<OrderEntity> getOrdersByUserId(String userId) {
        return orderRepository.findByUserId(userId);
    }
}- OrderController
@RestController
@RequestMapping("/order-service")
public class OrderController {

    Environment env;
    OrderService orderService;

    @Autowired
    public OrderController(Environment env, OrderService orderService) {
        this.env = env;
        this.orderService = orderService;
    }

    @GetMapping("/health_check")
    public String status() {
        return String.format("It's Working in Order Service on PORT %s", env.getProperty("local.server.port"));
    }

    @PostMapping("/{userId}/orders")
    public ResponseEntity<ResponseOrder> createOrder(@PathVariable(name = "userId") String userId,
                                                           @RequestBody RequestOrder orderDetails) {
        ModelMapper mapper = new ModelMapper();
        mapper.getConfiguration().setMatchingStrategy(MatchingStrategies.STRICT);

        OrderDto orderDto = mapper.map(orderDetails, OrderDto.class);
        orderDto.setUserId(userId);
        OrderDto createOrder = orderService.createOrder(orderDto);

        ResponseOrder responseOrder = mapper.map(createOrder, ResponseOrder.class);

        return ResponseEntity.status(HttpStatus.CREATED).body(responseOrder);
    }

    @GetMapping("/{userId}/orders")
    public ResponseEntity<List<ResponseOrder>> getOrder(@PathVariable(name = "userId") String userId) {
        Iterable<OrderEntity> orderList = orderService.getOrdersByUserId(userId);

        List<ResponseOrder> result = new ArrayList<>();
        orderList.forEach(v -> {
            result.add(new ModelMapper().map(v, ResponseOrder.class));
        });

        return ResponseEntity.status(HttpStatus.OK).body(result);
    }

}
API Gateway (Spring Cloud Gateway)와 연동
이제 다음과 같이 API Gateway에 연동하자. apigatewat-service 의 application.yml 파일에 다음을 추가하자.
routes:
  - id: order-service
    uri: lb://ORDER-SERVICE
    predicates:
      - Path=/order-service/**
이제 모든 서비스를 실행시키자. Eureka dashboard에 다음과 같이 뜬다.

여기서 오류를 한참 겪었다. 나는 h2 database의 url을 jdbc:h2:~/testdb 로 활용했다. 하지만 이러면 메모리 DB가 아닌, 물리적인 데이터 파일을 2개의 인스턴스에서 공유하는 설정이 되어 버려서, 서버모드로 실행하라는 오류가 발생하게 된다.
모든 경로를 jdbc:h2:mem:testdb 와 같이 바꾸자
https://www.inflearn.com/questions/203588/h2-%EC%97%B0%EA%B2%B0-%EB%AC%B8%EC%A0%9C
h2 연결 문제 - 인프런 | 질문 & 답변
order-service 두개 실행하면 연결이 자꾸 깨지네요h2 버전도 1.3대로 변경했고 yml 파일도 강사님 설정과 같은데 뭐가 문제일까요...구글링하면 server 모드로 사용하라는데 강사님은 embeded 모드인데도
www.inflearn.com
이제 개발한 3개의 서비스의 API를 모두 사용해보자.
- 회원가입
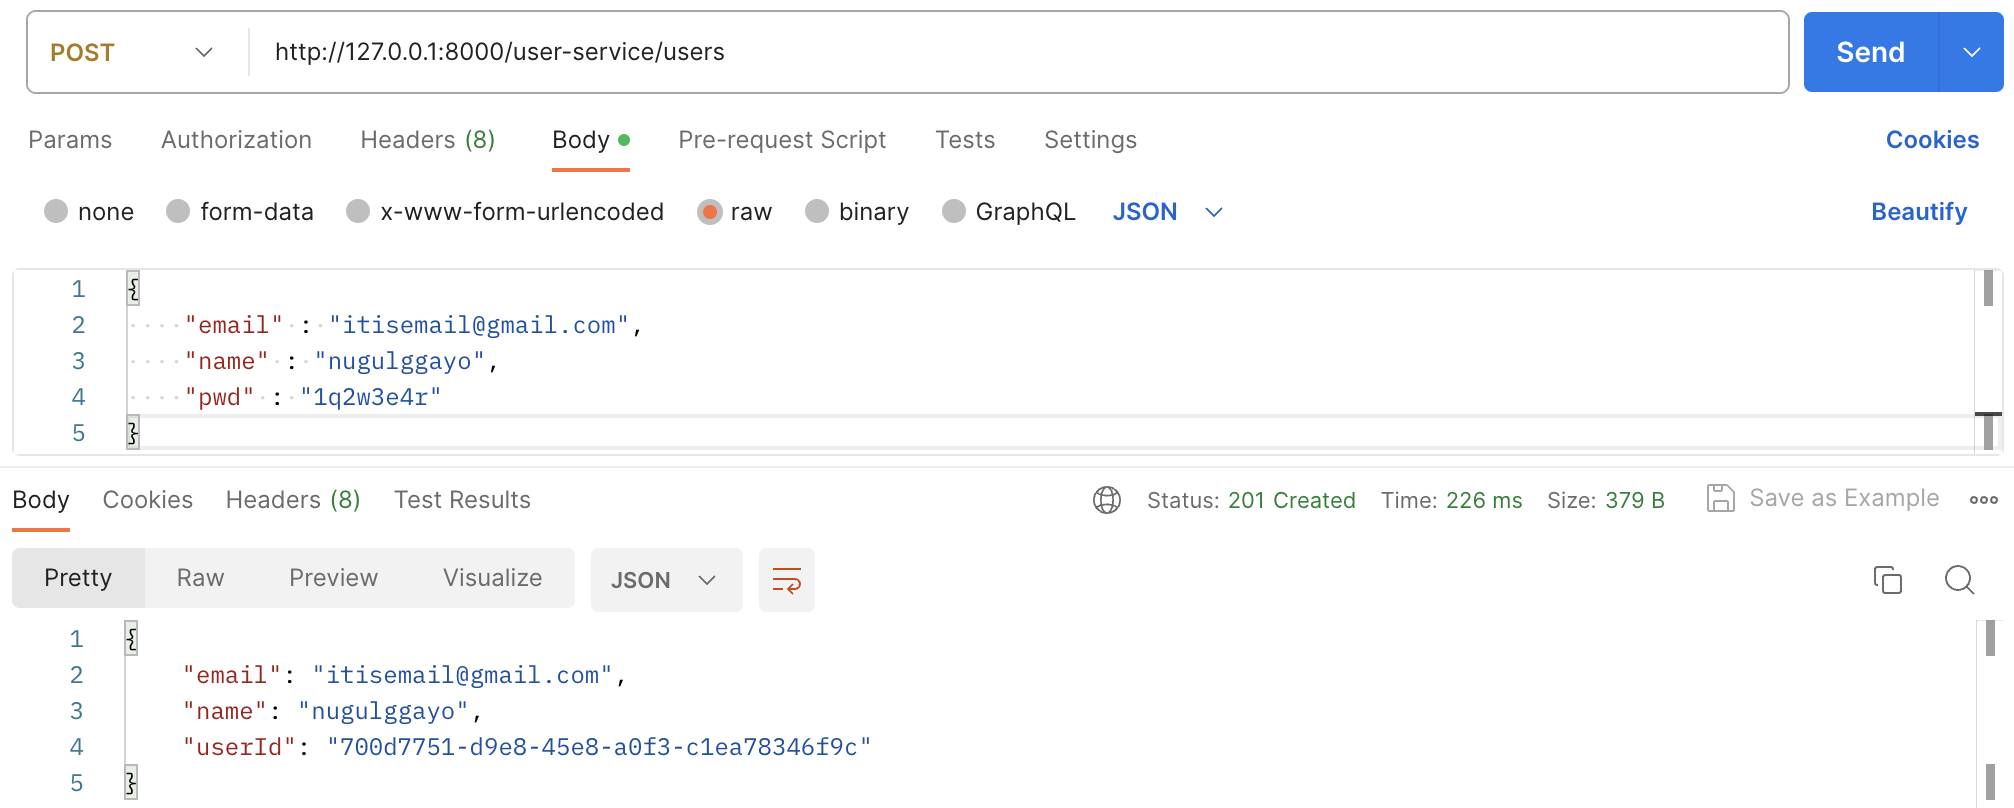
- 회원 가입상품 목록 조회
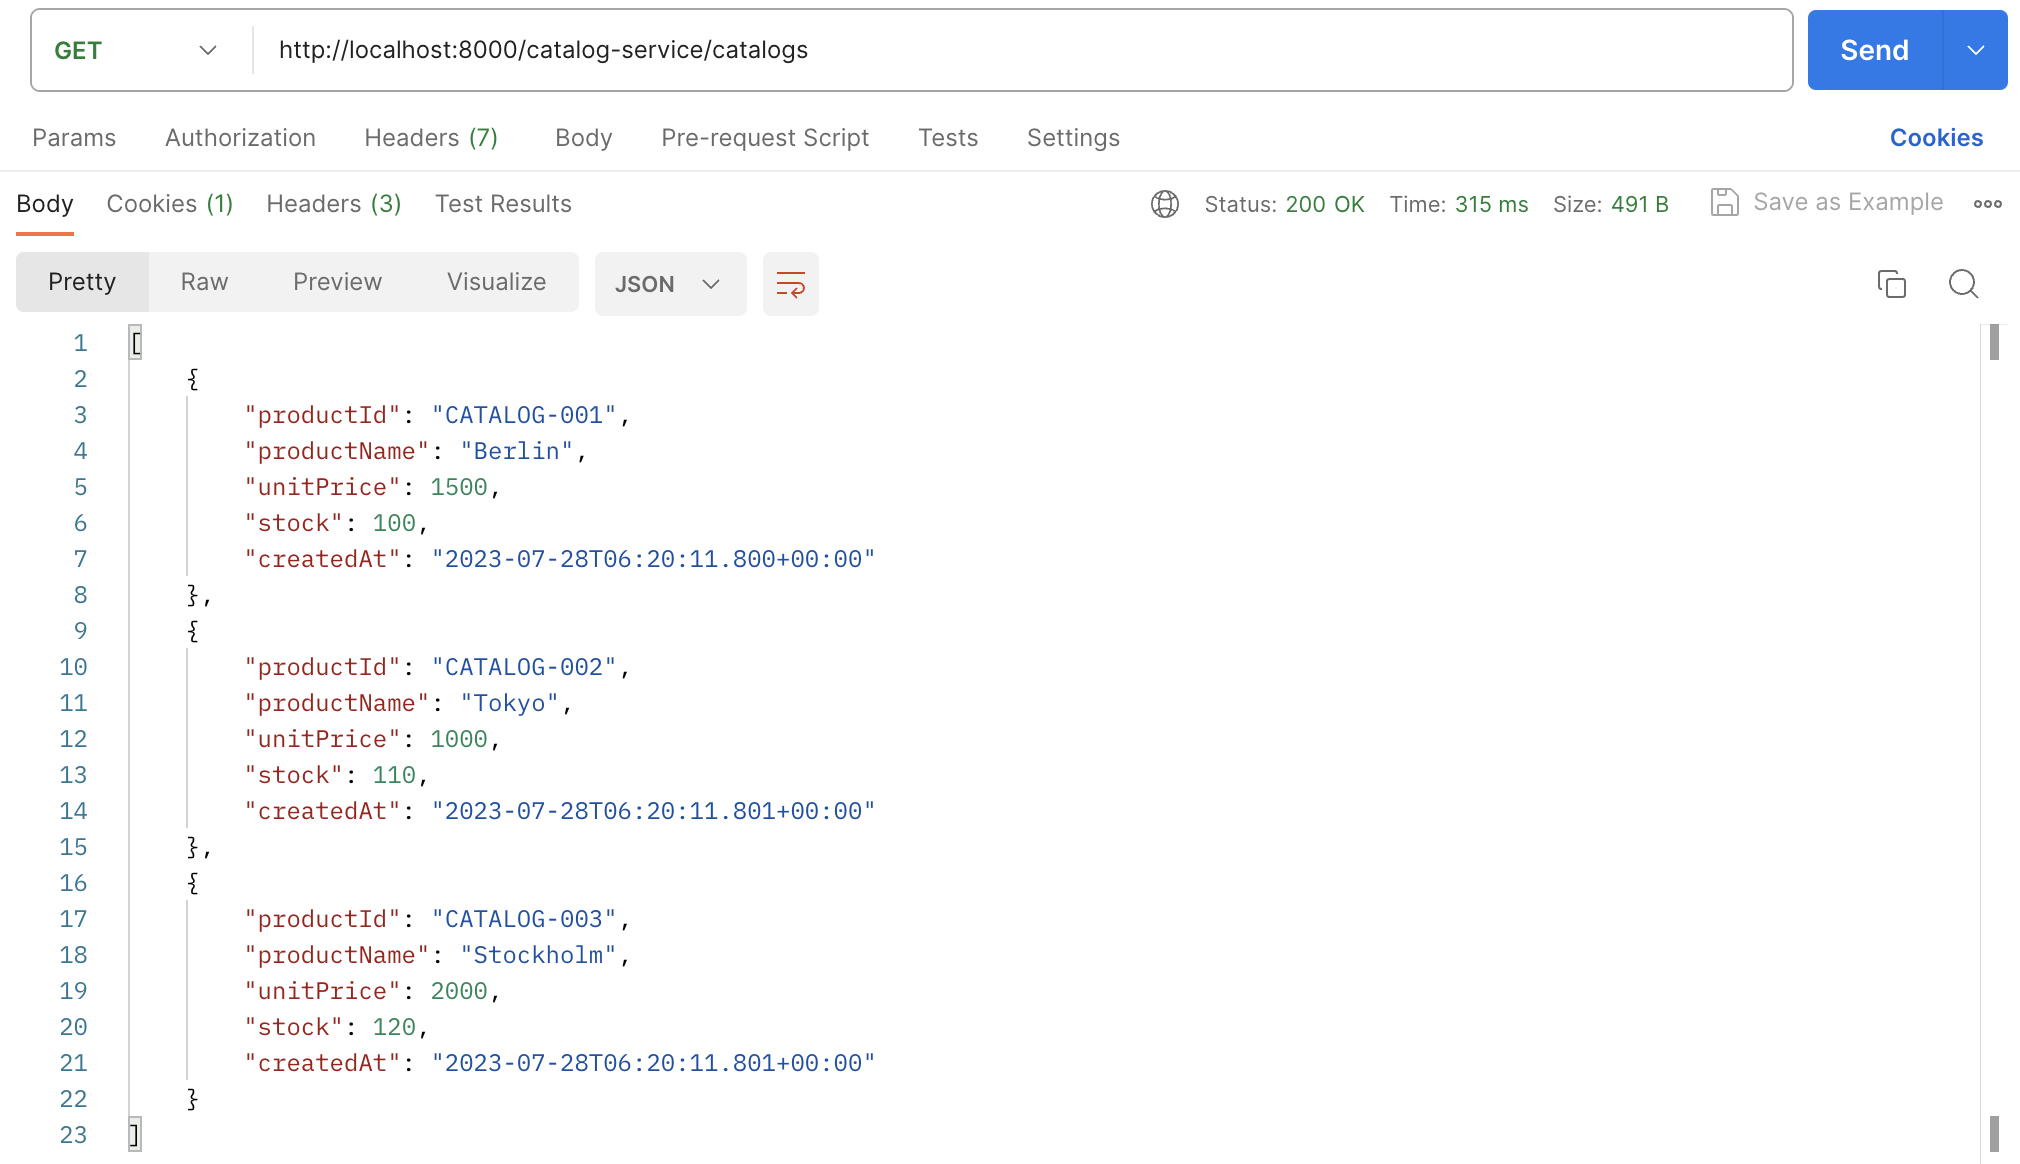
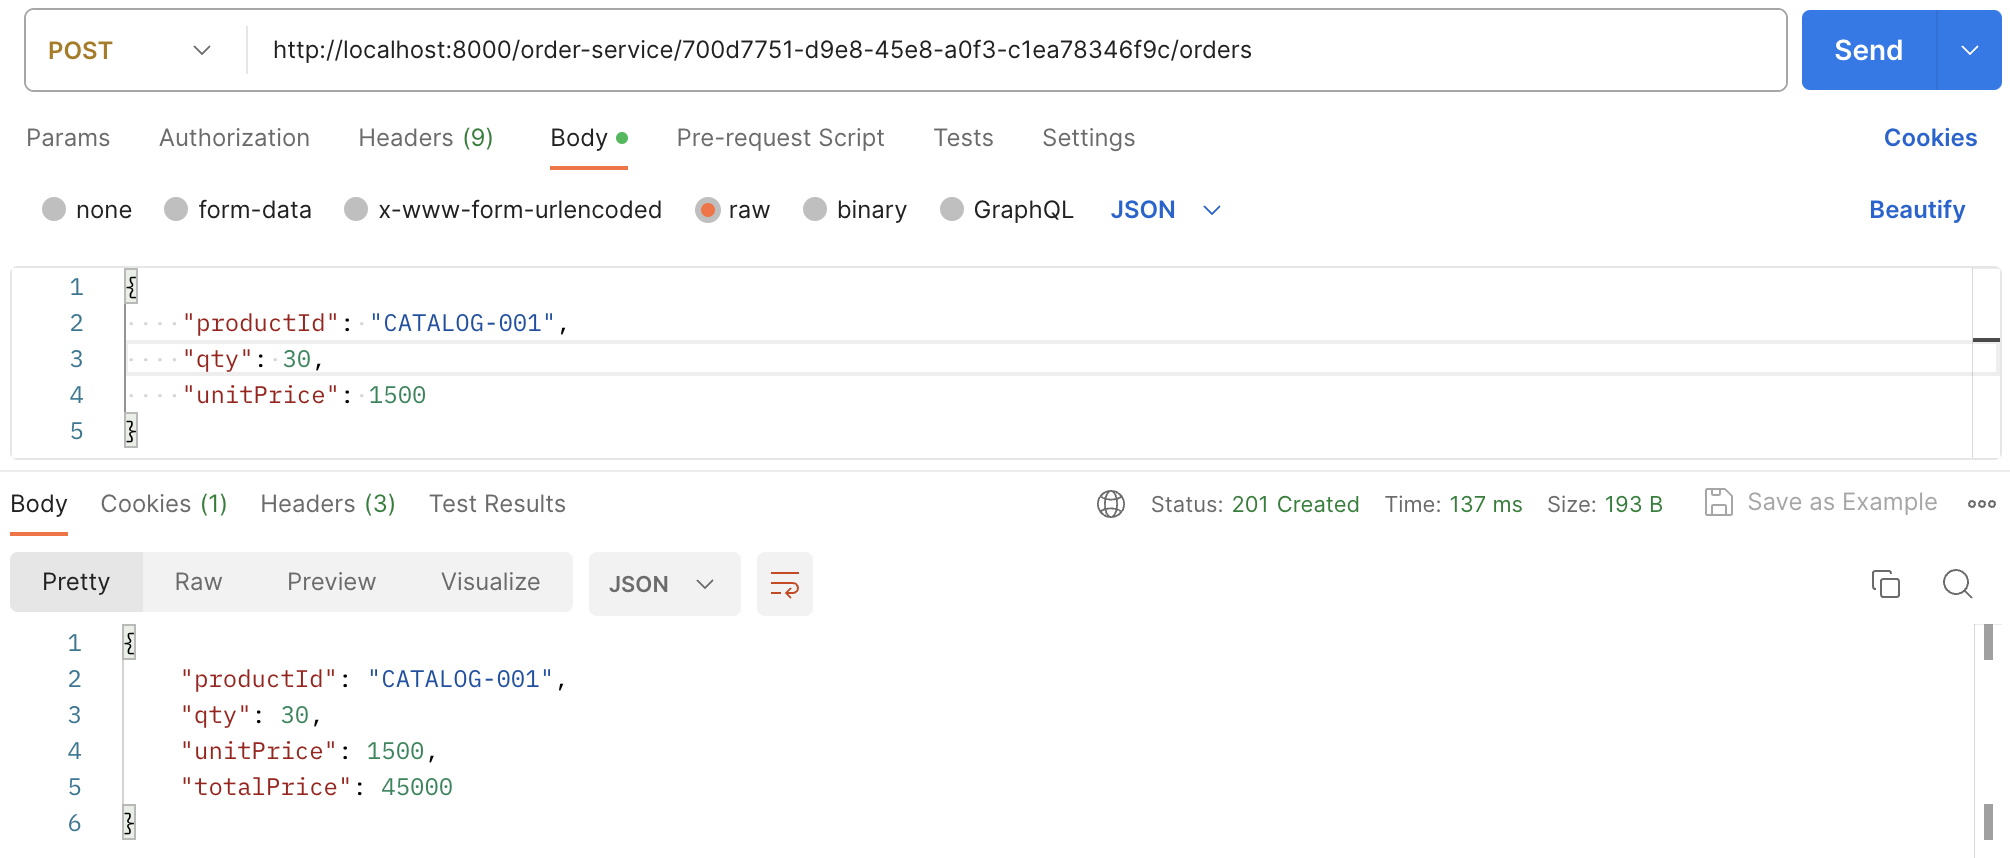
- 사용자 별 상품 주문
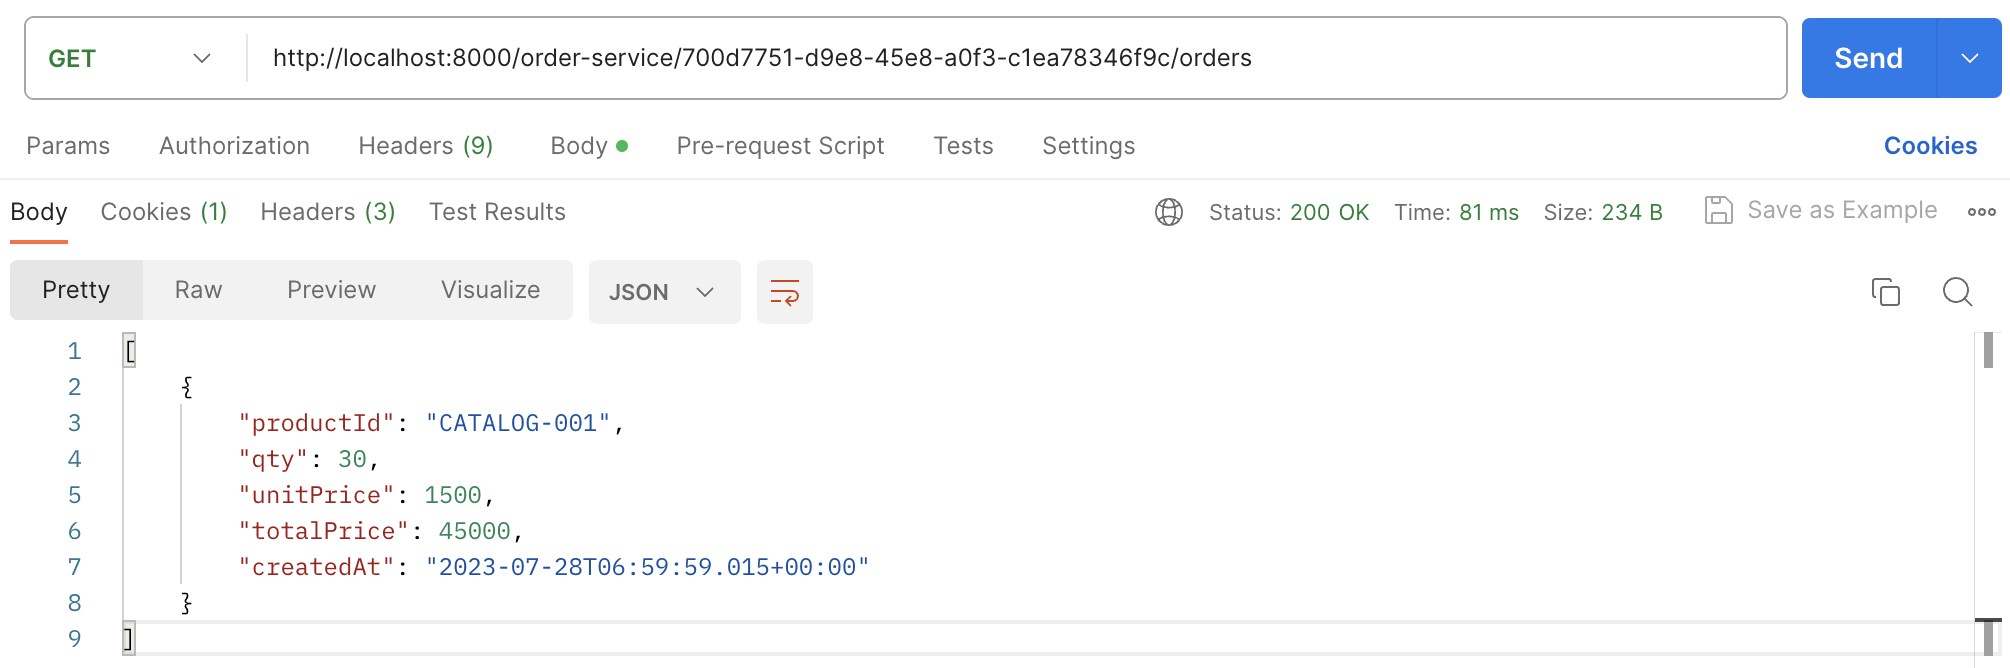
- 사용자 별 주문 조회
'[MSA] Spring Cloud로 개발하는 마이크로서비스 애플리케이션' 카테고리의 다른 글
| 섹션 7 : Spring Cloud로 개발하는 마이크로서비스 애플리케이션(MSA) (0) | 2023.08.04 |
|---|---|
| 섹션 6 : Spring Cloud로 개발하는 마이크로서비스 애플리케이션(MSA) (0) | 2023.08.04 |
| 섹션 4 : Spring Cloud로 개발하는 마이크로서비스 애플리케이션(MSA) (0) | 2023.07.28 |
| 섹션 3 : Spring Cloud로 개발하는 마이크로서비스 애플리케이션(MSA) (0) | 2023.07.21 |
| 섹션 2 : Spring Cloud로 개발하는 마이크로서비스 애플리케이션(MSA) (2) | 2023.07.21 |