이 글은 인프런 Spring Cloud로 개발하는 마이크로서비스 애플리케이션(MSA) 강의를 듣고 쓴 글입니다.
Spring Cloud로 개발하는 마이크로서비스 애플리케이션(MSA) - 인프런 | 강의
Spring framework의 Spring Cloud 제품군을 이용하여 마이크로서비스 애플리케이션을 개발해 보는 과정입니다. Cloud Native Application으로써의 Spring Cloud를 어떻게 사용하는지, 구성을 어떻게 하는지에 대해
www.inflearn.com
Spring Cloud Config
분산 시스템에서 서버, 클라이언트 구성에 필요한 설정 정보를 기존에는 application.yml 파일에서 관리했는데, 이것을 외부 시스템에서 관리해서 하나의 중앙화된 저장소에서 관리한다. 수정 시 각 서비스를 다시 빌드할 필요가 없고 바로 적용 가능하다.
애플리케이션 배포 파이프라인을 통해 DEV-UAT-PROD (개발-테스트-프로덕션) 각각의 환경에 맞는 구성 정보를 사용할 수 있다.
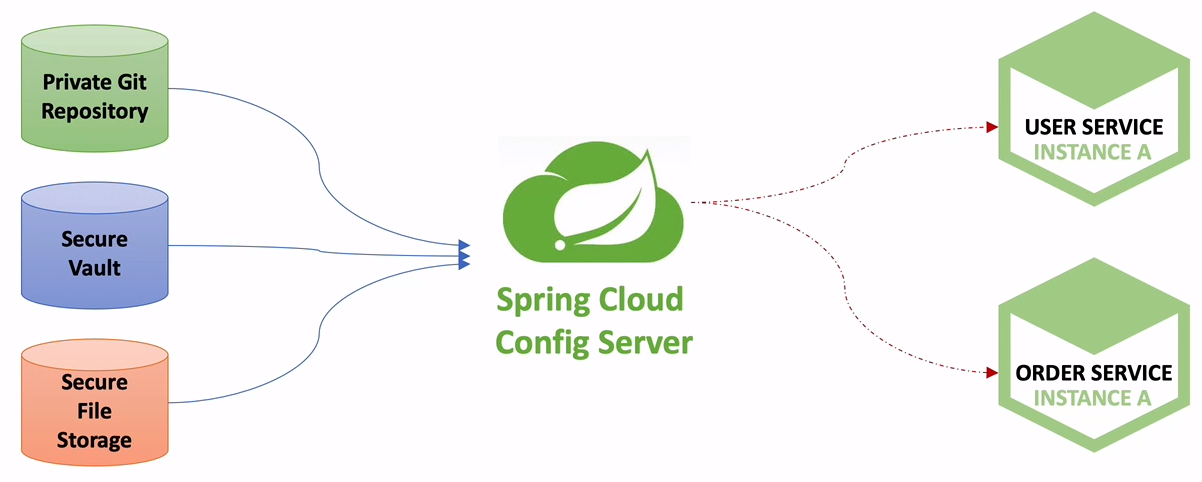
보통 코드를 형상 관리하기 위해 가장 많이 사용하는 것이 Git 이다. 특히 Remote에 올리지 않고도 local 상태에서만 관리할 수도 있다.
3개 중 어떤 곳에든 저장을 하고, 그 설정 정보들을 Config Server가 동적으로 서비스에 전달해준다.
우리가 할 것은 Git 을 이용해서 개발 환경의 user, order, catalog, apigateway service 들에 설정 정보를 제공하는 서버를 만들 것이다.
Local Git Repository
우선, 설정 정보를 가지고 있을 ecommerce.yml 파일을 만들고, git으로 관리해야 한다.
원하는 경로에 git이 관리할 폴더를 만들고 그 안에 ecommerce.yml 파일을 다음과 같이 만들어 커밋을 한다.
token:
  expiration_time: 86400000
  secret: user_token

gateway:
  ip: 192.168.0.17
이제 실제 설정 서비스를 만들자. 여태까지 했던 것과 동일한 설정으로 config-server 프로젝트를 만들고, 의존성은 spring cloud config server 하나만 넣는다. 그 후 메인 클래스에 @EnableConfigServer 어노테이션을 붙이고, application.yml 파일에 다음을 추가한다.
server:
  port: 8888

spring:
  application:
    name: config-service
  cloud:
    config:
      server:
        git:
uri: file:///Users/morenow/Desktop/MSA/git-local-repo- 포트 번호는 기본적으로 8888이지만 한 번 더 명시한 것이다.
- configration 정보가 있는 파일의 경로를 적는다. file:// 을 이용해 파일 프로토콜을 이용한다.
이제 서버를 기동시킨 후 localhost:8888/ecommerce/default 로 접속하면 다음과 같이 설정 파일들이 잘 뜬다.

이제 user-service에서 이 정보들을 가져오자.
user-service에 있던 token 정보들을 application.yml 파일에서 주석처리하자.
그리고 pom.xml에 다음의 의존성을 추가하자.
<dependency>
    <groupId>org.springframework.cloud</groupId>
    <artifactId>spring-cloud-starter-config</artifactId>
</dependency>
<dependency>
    <groupId>org.springframework.cloud</groupId>
    <artifactId>spring-cloud-starter-bootstrap</artifactId>
</dependency>
이제 application.yml 파일과 같은 경로에 bootstrap.yml 파일을 생성하고 다음과 같이 작성하자.
spring:
  cloud:
    config:
      uri: http://127.0.0.1:8888
name: ecommerce- bootstrap.yml 파일은 application.yml 파일보다 먼저 설정정보가 적용되는 파일이다.
- name 값은 설정정보 파일의 이름이다. 우리는 ecommerce.yml 이므로 저렇게 작성한다.
이제 저 정보들을 잘 가져오는지 보기 위해 health_check API 를 수정한다.
@GetMapping("/health_check")
public String status() {
    return String.format("It's Working in User Service"
            + ", port(local.server.port) = " + env.getProperty("local.server.port")
            + ", port(server.port) = " + env.getProperty("server.port")
            + ", token secret = " + env.getProperty("token.secret")
            + ", token expiration time = " + env.getProperty("token.expiration_time")
    );
}
이제 서비스를 기동하면 콘솔에 다음과 같이 잘 config 서버와 연결되고 내가 요청한 경로에서 설정 정보를 가져온 것을 볼 수 있다.
Fetching config from server at : http://127.0.0.1:8888
Located property source: [BootstrapPropertySource {name='bootstrapProperties-configClient'}, BootstrapPropertySource {name='bootstrapProperties-file:///Users/morenow/Desktop/MSA/git-local-repo/ecommerce.yml'}]
이제 health_check API 를 테스트해보자.

ecommerce.yml 파일의 정보를 잘 가져온 것을 볼 수 있다.
이제 설정 정보, 즉 ecommerce.yml 파일의 정보가 변경되면 어떻게 refresh 할 수 있을까? 다음의 3가지 방법이 있다.
- 서버 재기동
- Actuator refresh
- Spring cloud bus 사용
우선, 1번은 사용하면 좋지 않다. 설정정보의 변경이 있을 때마다 서버를 재기동하는 것을 피하기 위해 config server 를 운영하는 것이다.
따라서 우린 2,3번을 학습할 것이다. 우선 2번을 적용해보자.
Spring Boot Actuator
User Service
Spring Boot 에서 다양한 endpoint 들을 제공해주는 dependency이다. beans, health, httptrace 등 상태 정보 등을 볼 수 있는 많은 기능을 제공한다. 우리는 그 중 설정 정보를 다시 가져오기 위해 사용한다. 다음을 user-service의 pom.xml 파일에 추가한다.
<dependency>
    <groupId>org.springframework.boot</groupId>
    <artifactId>spring-boot-starter-actuator</artifactId>
</dependency>
이제 actuator 에서 제공하는 여러 API 들을 사용할 수 있다. 우리는 refresh, health, beans 라는 API 를 사용해 볼 것이다. 이를 위해 다음 코드를 application.yml 파일에 추가한다.
management:
  endpoints:
    web:
      exposure:
        include: refresh, health, beans
여러 actuator의 API 들에 대해서는 다음을 참고하자.
https://docs.spring.io/spring-boot/docs/current/actuator-api/htmlsingle/
Spring Boot Actuator Web API Documentation
The conditions endpoint provides information about the evaluation of conditions on configuration and auto-configuration classes. 5.1. Retrieving the Report To retrieve the report, make a GET request to /actuator/conditions, as shown in the following curl-b
docs.spring.io
이제 actuator 와 관련된 API 에는 인증을 필요로 하지 않고 모두 허용할 수 있게 WebSecurity에 다음을 추가하자.
.requestMatchers(mvc.pattern("/actuator/**")).permitAll()
user-service에 /actuator/health 로 GET 요청을 보내보자.
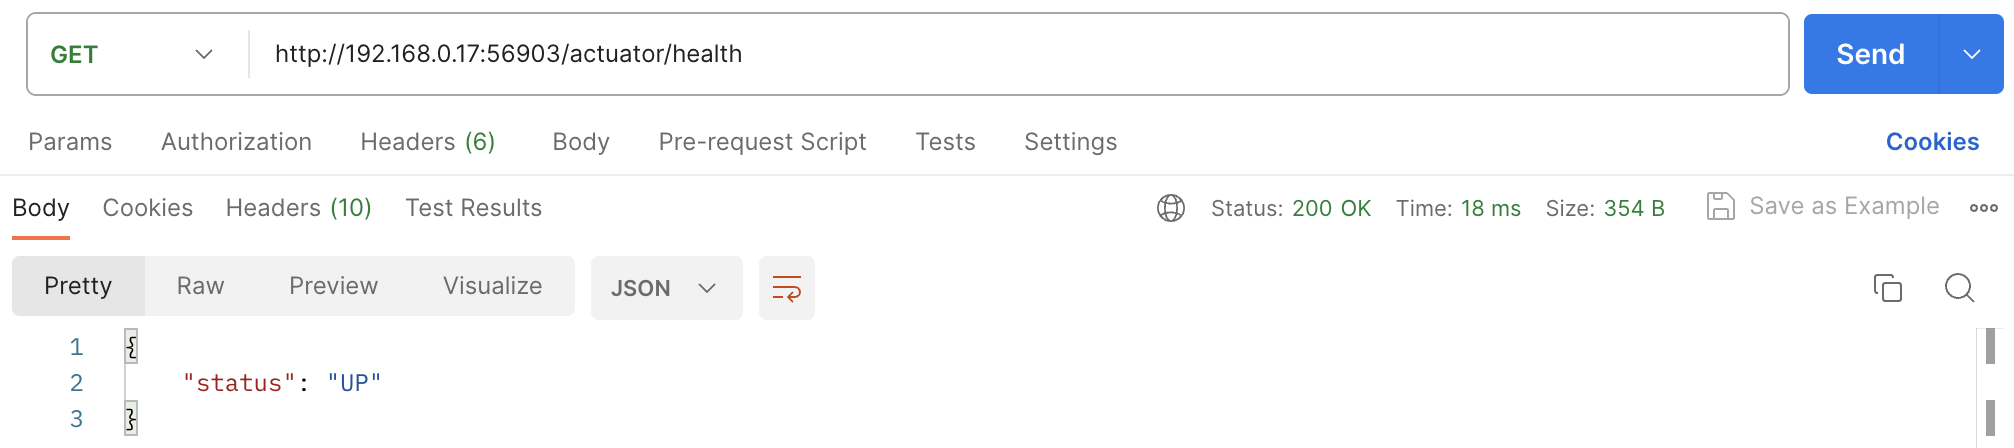
현재 잘 올라와있다는 UP 표시가 뜨게 된다.
다음으로 /actuator/beans 로 GET 요청을 보내보자.
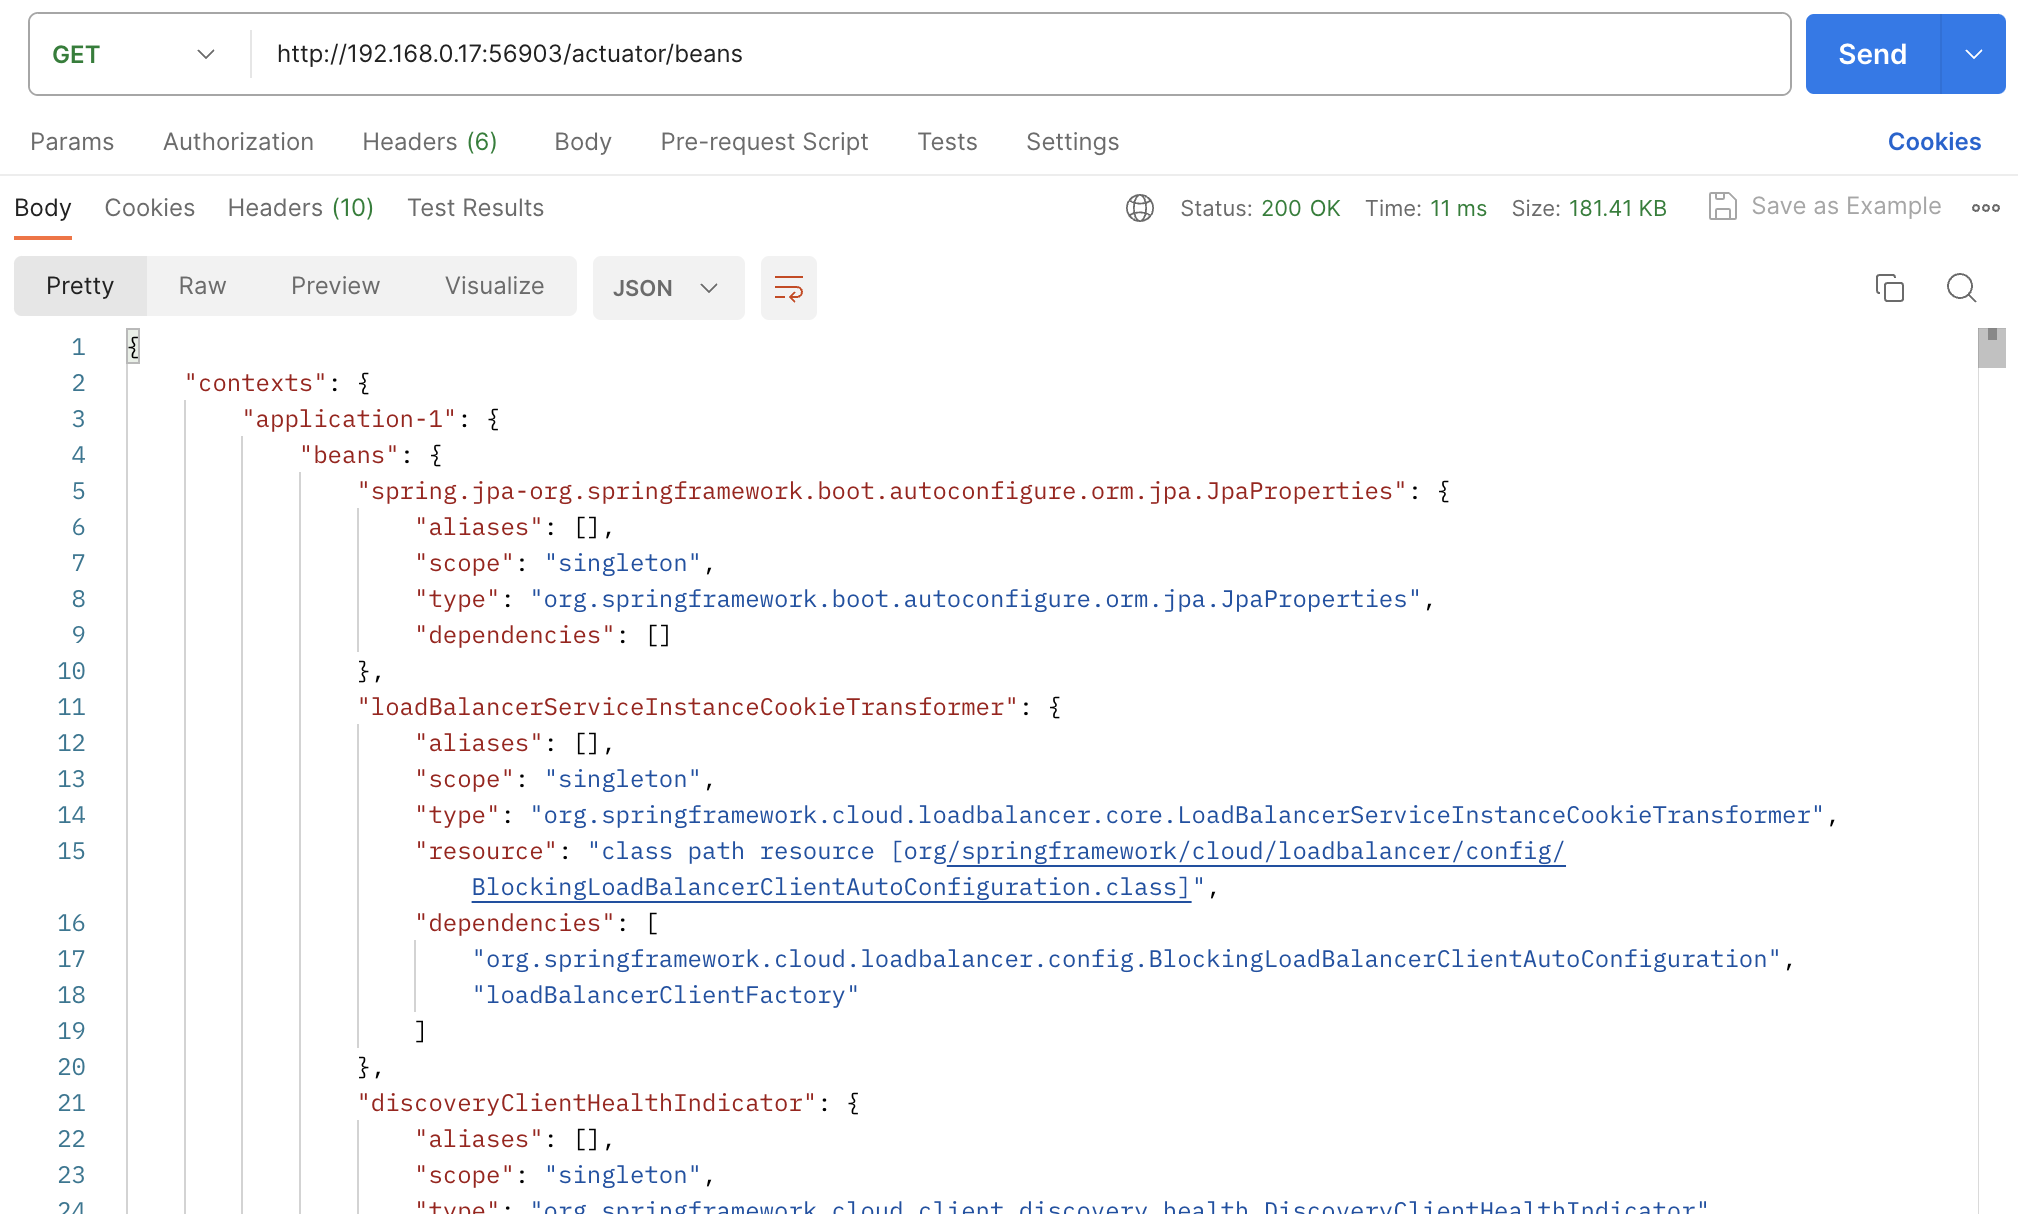
내 어플리케이션에 등록된 빈들을 모두 보여준다.
이제 실제 목표인 /actuator/refresh를 사용해보자. 이 요청은 POST 이다. 설정정보를 변경하고 해당 요청을 보내면 refresh 된다.
다음 사진과 같이 현재 토큰 유효시간은 864이다.

이 설정을 바꿔보자. ecommerce.yml 파일에 가서 token.expiration_time 을 86400000 으로 수정하고 commit을 한다.

이러고 /actuator/refresh POST 요청을 보내면 다음과 같은 결과를 볼 수 있다.
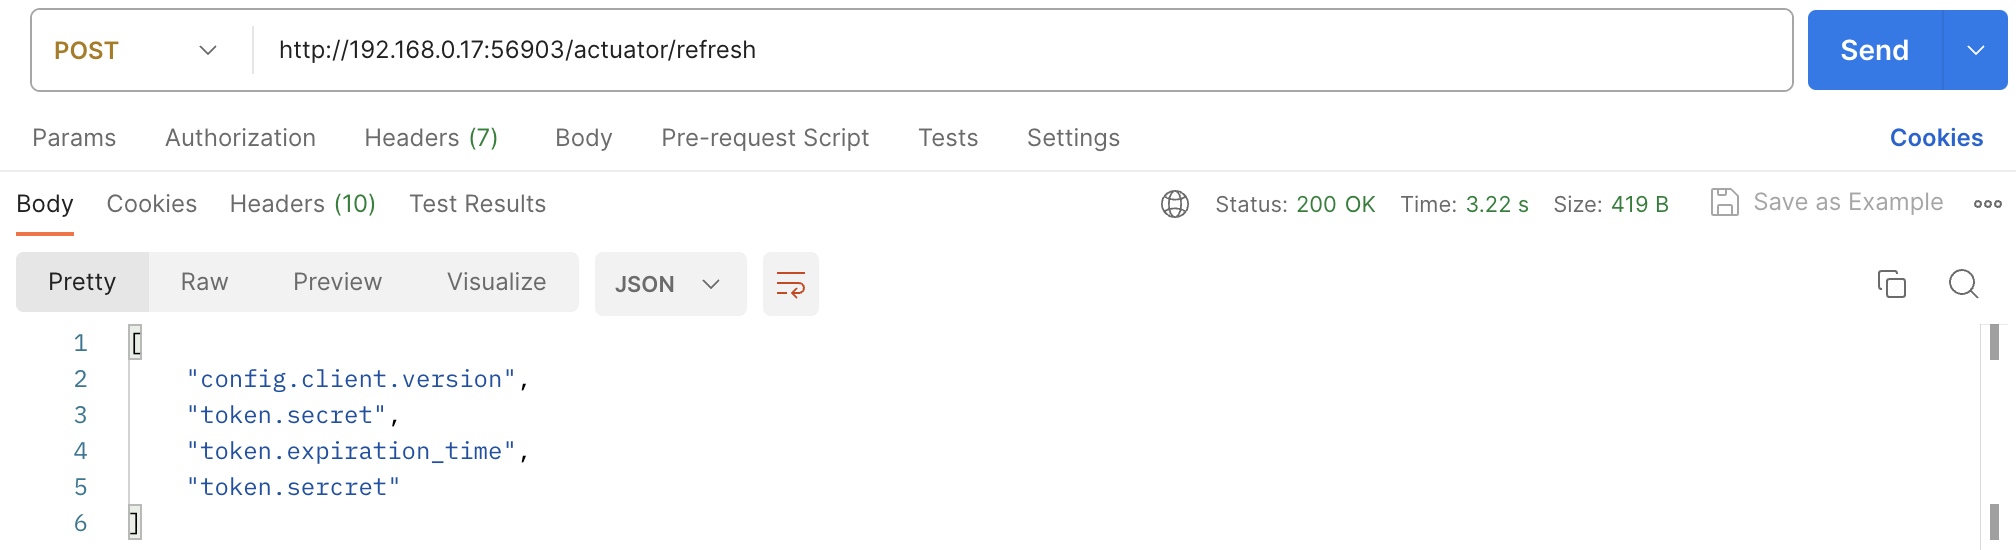
바뀐 것들을 보여준다. (token.secret은 안 바꿨는데 이상하네...)
이제 다시 health_check 요청을 보내보자.

서버를 재기동하지 않고도 설정 값을 바꾸는 데 성공했다.
Spring Gateway
Spring Gateway 에도 configuration server를 등록시켜보자.
apigateway-service의 pom.xml에 다음과 같은 의존성을 추가한다.
<dependency>
    <groupId>org.springframework.cloud</groupId>
    <artifactId>spring-cloud-starter-config</artifactId>
</dependency>
<dependency>
    <groupId>org.springframework.cloud</groupId>
    <artifactId>spring-cloud-starter-bootstrap</artifactId>
</dependency>
<dependency>
    <groupId>org.springframework.boot</groupId>
    <artifactId>spring-boot-starter-actuator</artifactId>
</dependency>
그리고 다음 코드를 application.yml 파일에 입력한다. gateway에서는 httptrace API 도 사용해 볼 것이다.
management:
  endpoints:
    web:
      exposure:
        include: refresh, health, beans, httptrace
httptrace 를 사용하기 위해 메인 클래스에 다음 코드를 추가해 빈을 생성한다.
@Bean
public HttpTraceRepository httpTraceRepository() {
    return new InMemoryHttpTraceRepository();
}
모든 설정이 끝났다. 이제 gateway를 재기동하면 아까와 같이 refresh를 활용할 수 있다.
다만, 설정 변경 시 모든 서비스에 refresh 요청을 날려야 하는 등의 번거로움이 있어서 아까 말한 3번째 방법인 Spring Cloud Bus 를 다음 섹션에서 다룬다.
Profiles을 사용한 configuration 적용
설정 파일이 서비스마다 다른 멀티 환경이 있다면, 이름을 달리해서 가져오면 된다.
예를 들어, ecommerce-dev.yml 파일을 만들어서 개발 용도의 설정파일을 만드는 것이다. 이렇게 profile을 이용해서 서비스마다 다른 설정파일을 불러온다.
만약 ecommerce-dev.yml 파일이 없다면, default 파일인 ecommerce.yml 파일을 찾아가게 된다. 그것도 없으면 더 default 파일인 application.yml 파일을 찾아가게 된다.
설정파일이 있는 경로에 다음 두 파일을 추가하고 커밋한다.
#ecommerce-dev.yml
token:
  expiration_time: 86400000
  secret: my_token_dev

gateway:
  ip: 192.168.0.17
#ecommerce-prod.yml
token:
expiration_time: 86400000
secret: my_token_prod
gateway:
ip: 192.168.0.17이제 user-service 의 bootstrap.yml 파일을 다음과 같이 바꾸자.
spring:
  cloud:
    config:
      uri: http://127.0.0.1:8888
      name: ecommerce
  profiles:
    active: dev
apigateway-service 의 bootstrap.yml 파일은 다음과 같이 바꾸자.
spring:
  cloud:
    config:
      uri: http://127.0.0.1:8888
      name: ecommerce
  profiles:
    active: prod
이제, user-service 는 ecommerce-dev.yml 파일의 설정정보를, apigateway-service 는 ecommerce-prod.yml 파일의 설정정보를 가져올 것이다. 즉, jwt의 발급할 때와 인증할 때의 secret code 가 달라서 인증이 실패해야 한다.
이제 모두 실행하는데, apigateway-service는 디버깅 모드로 실행한다.
회원가입과 로그인을 차례대로 진행해보자.
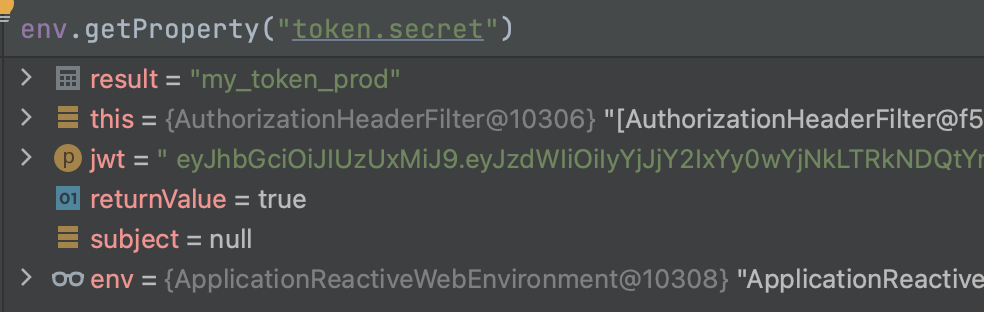
Gateway 에서는 secret이 "my_token_prod"로 잘 나온다. 하지만 발급할 때 secret은 "my_token_dev"로 서로 다르기 때문에, 결과인 subject가 나오지 않았다. 따라서 인증이 실패하게 된다.
apigateway-service 에서도 dev profile 을 사용하게 바꿔주면 인증이 잘 되는 것을 확인할 수 있다.
Remote Git Repository
이제 로컬 환경에서 가져왔던 설정 정보들을 깃허브 사이트에 올려 가져오도록 하자.
원래 설정정보는 private으로 만드는 게 좋지만,,, 깃허브 인증 방식이 username, password 에서 token 방식으로 바뀐 것을 다들 알고 있을 것이다. 검색해보니 아직 자료들이 token 방식을 소개하지 않아서 일단 public 으로 공부한 뒤 나중에 바꾸려고 한다.
깃허브 레포지토리를 만들고 여태까지 commit한 설정정보 파일들을 push한다.
이제 다음과 같이 config-server의 uri 정보를 remote 주소로 바꾼다.
spring:
application:
name: config-service
cloud:
config:
server:
git:
# uri: file:///Users/morenow/Desktop/MSA/git-local-repo
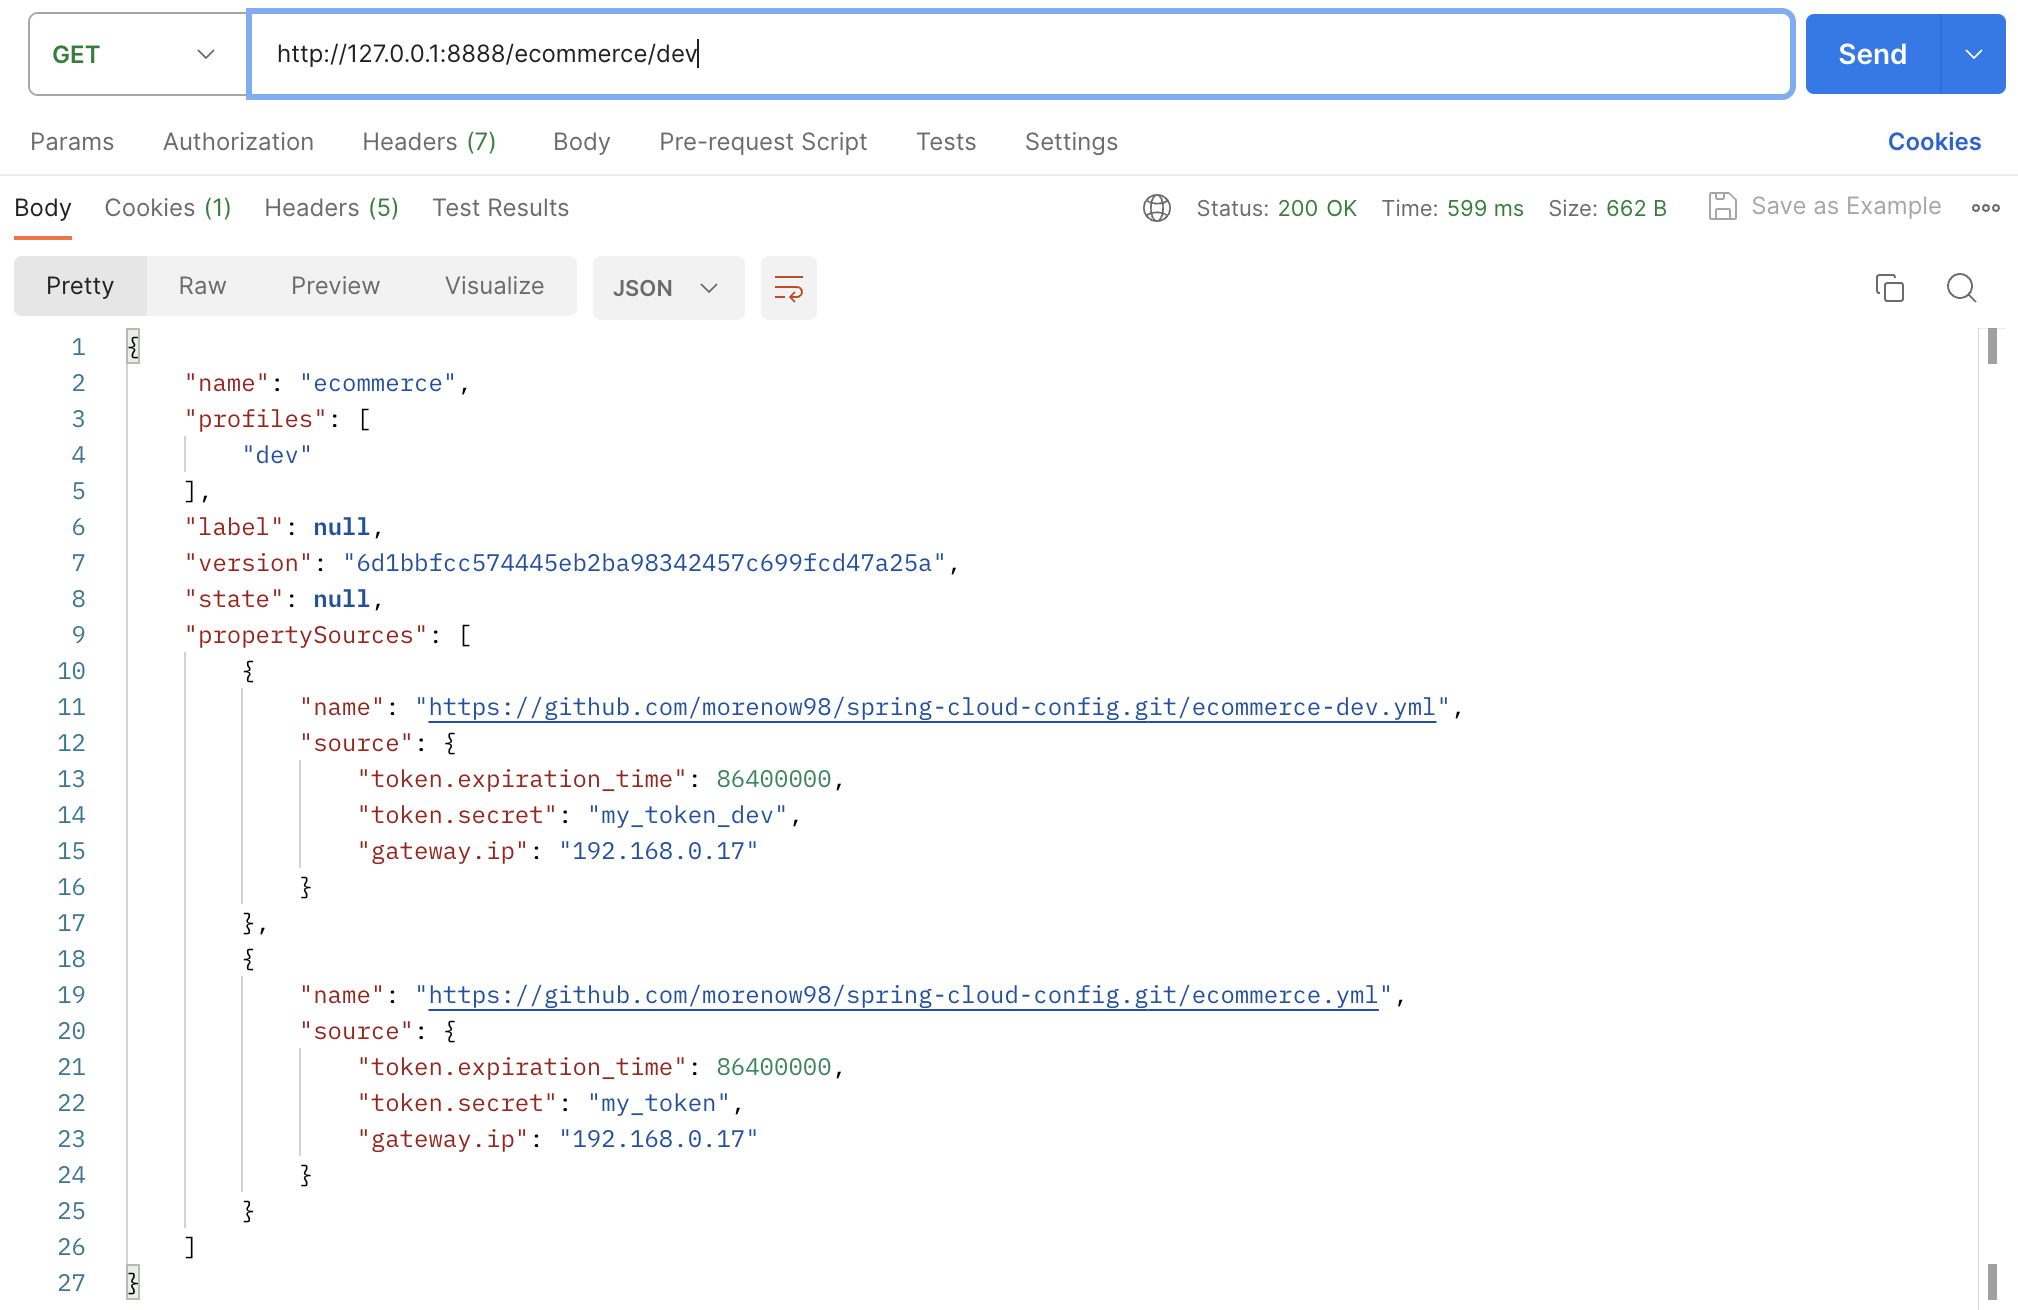
uri: https://github.com/morenow98/spring-cloud-config.git테스트해보자. 참고로 [application-name]-[profile].yml 파일을 불러오고 싶으면 http://127.0.0.1:8888/[application name]/[profile]로 불러오면 된다. 이러면 위에서 설명한 것과 같이 default 파일들을 찾아서 propertySources 들을 불러오게 된다.
Native File Repository
지금까지는 git을 커밋해야만 설정정보가 적용이 되었다. 이제 git을 사용하지 않고 직접 파일의 값을 읽어오는 것도 해보자.
원하는 경로에 폴더를 만들고 다음 3개의 파일을 만들자.
#application.yml
token:
  expiration_time: 86400000
  secret: user_token_native_application

gateway:
  ip: 192.168.0.17
#ecommerce.yml
token:
expiration_time: 86400000
secret: user_token_native_ecommerce
gateway:
ip: 192.168.0.17#user-service.yml
token:
expiration_time: 86400000
secret: user_token_native_user_service
gateway:
ip: 192.168.0.17이제 config-server 의 application.yml 파일을 다음과 같이 변경하자.
server:
  port: 8888

spring:
  application:
    name: config-service
  profiles:
    active: native
  cloud:
    config:
      server:
        native:
          search-locations: file://${user.home}/Desktop/MSA/native-file-repo
        git:
#          uri: file:///Users/morenow/Desktop/MSA/git-local-repo
uri: https://github.com/morenow98/spring-cloud-config.git- spring.profiles.active 를 native로 설정했으므로 spring.cloud.config.server.native 값만 적용되고 git 은 무시된다. spring.profiles.active 를 설정하지 않으면 git으로 기본 적용된다.
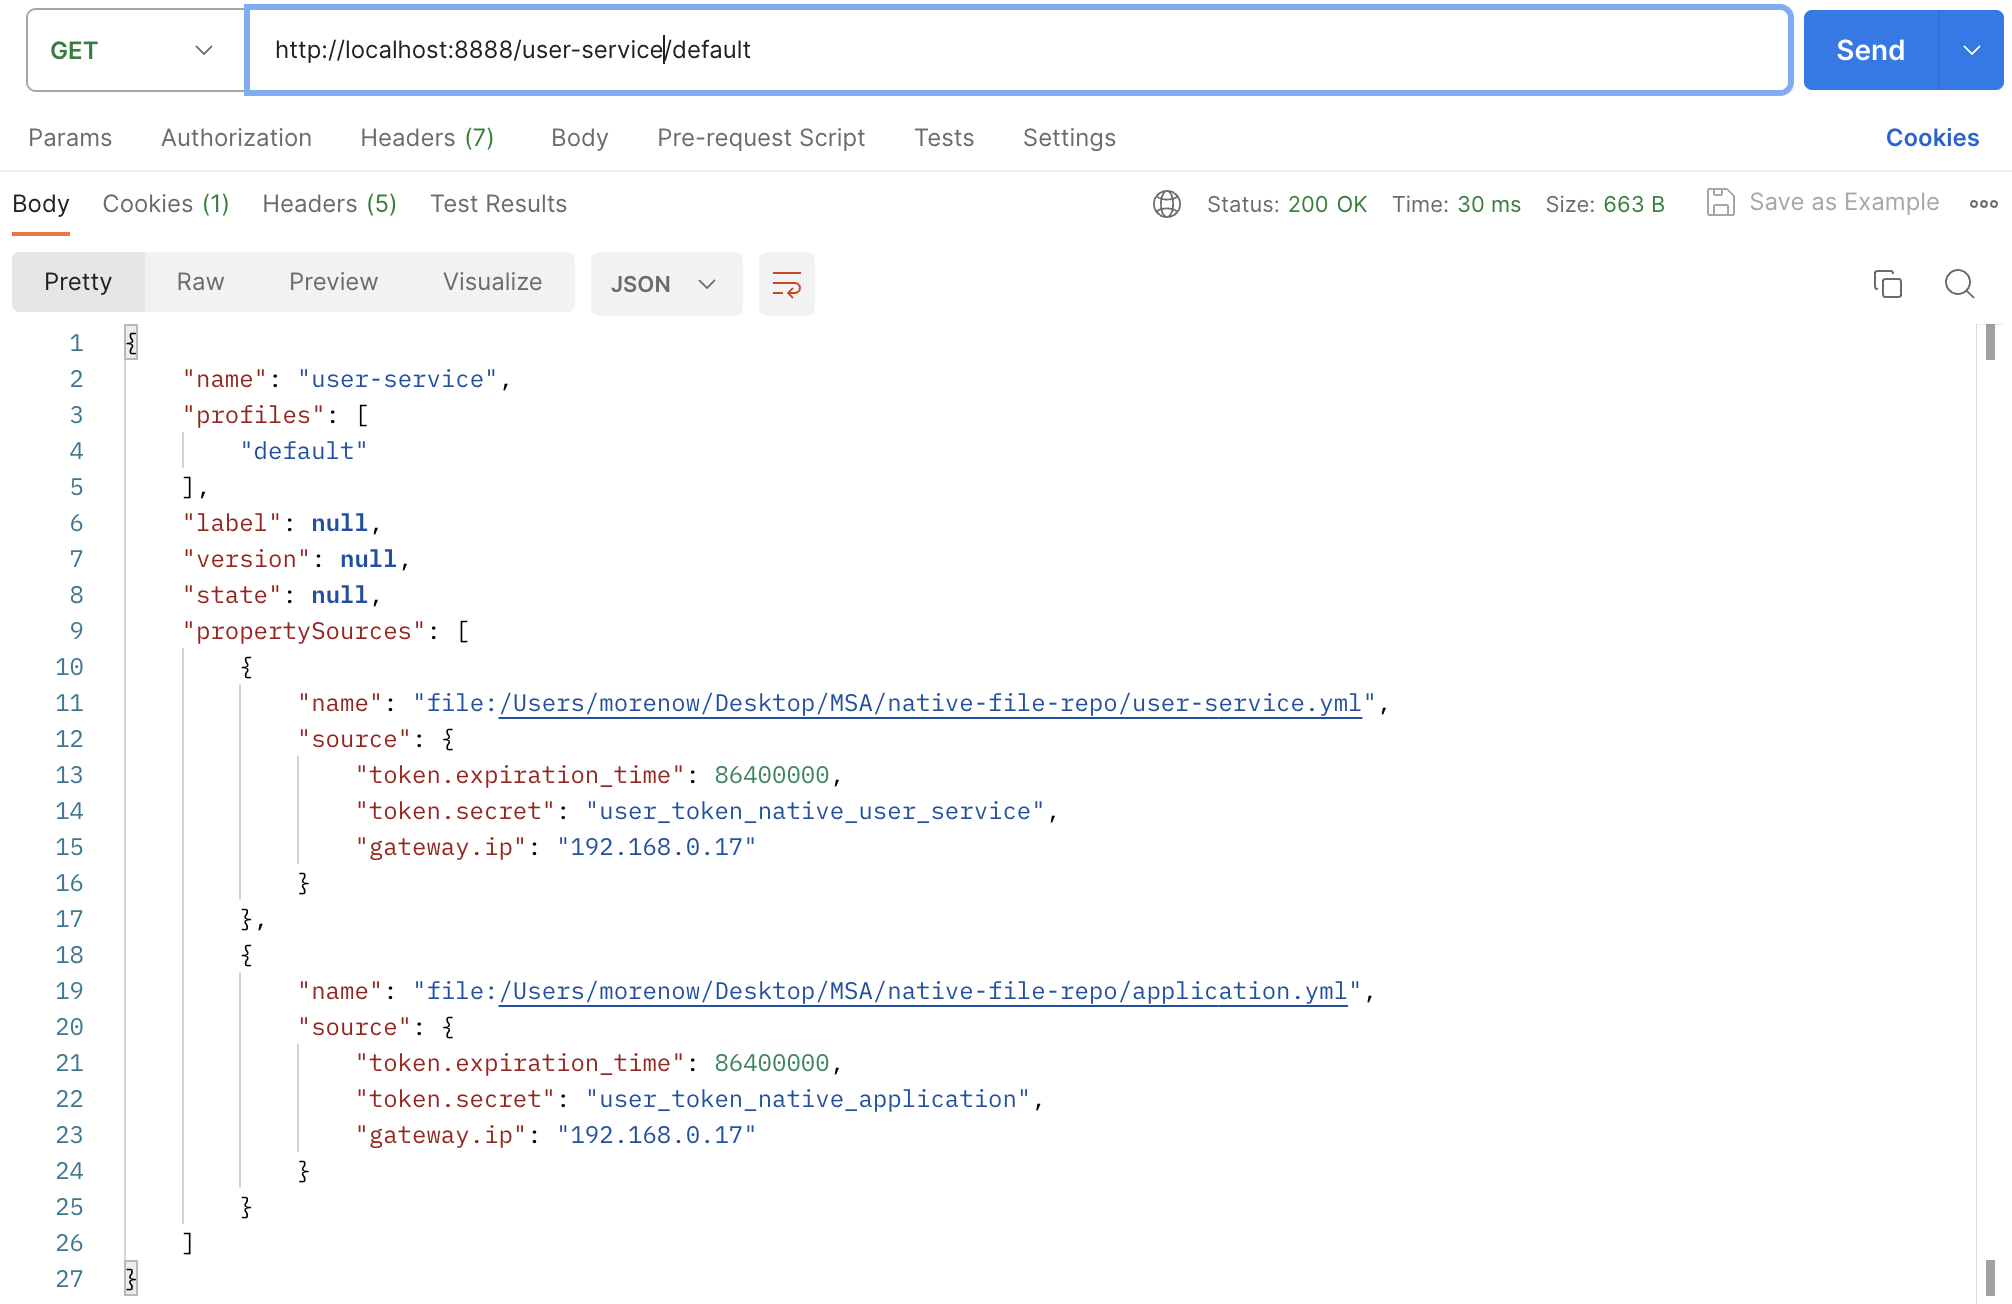
원하는 경로에 있던 user-service.yml와 그 default 파일인 application.yml 파일까지 잘 나오는 것을 볼 수 있다.
섹션6보다는 훨씬 쉬워서 다행이었어...
'[MSA] Spring Cloud로 개발하는 마이크로서비스 애플리케이션' 카테고리의 다른 글
| 섹션 9 : Spring Cloud로 개발하는 마이크로서비스 애플리케이션(MSA) (0) | 2023.08.11 |
|---|---|
| 섹션 8 : Spring Cloud로 개발하는 마이크로서비스 애플리케이션(MSA) (0) | 2023.08.11 |
| 섹션 6 : Spring Cloud로 개발하는 마이크로서비스 애플리케이션(MSA) (0) | 2023.08.04 |
| 섹션 5 : Spring Cloud로 개발하는 마이크로서비스 애플리케이션(MSA) (0) | 2023.07.28 |
| 섹션 4 : Spring Cloud로 개발하는 마이크로서비스 애플리케이션(MSA) (0) | 2023.07.28 |